Recent posts with visuals

March 26, 2016

The great bread experiment

Bread is the only food I know that satisfies completely, all by itself. It comforts the body, charms the senses, gratifies the soul, and excites the mind. A little butter also helps.
~ Jeffrey Steingarten, The Man Who Ate Everything


In November 2006, The New York Times published a bread recipe from Mr. Jim Lahey, of Sullivan Street Bakery. A recipe that was so simple a child could follow it and produce bakery-quality bread. The article ignited a home-baking frenzy, generated countless blog posts, discussion boards and demo videos, and remains one of the most popular recipes The Times has ever published.

It did not work for me.
Not because it didn't make incredibly delicious bread (it did!), but because working with the dough was frustratingly difficult.

Traditionally, bread is made with just four ingredients - flour, water, salt, and yeast. Yeast is a living organism, and consumes the carbohydrates found in the flour, producing carbon dioxide gas. In addition to carbohydrates, flour also contains gluten, a protein which forms long, flexible strands when the dough is kneaded. When the dough is proofing (or rising) the CO2 bubbles are trapped in the elastic network formed by the gluten strands. This forces the dough to expand in volume and at the same time to lighten in texture, and allows the bread loaf to hold its shape.

Mr. Lahey's recipe eliminates the laborious and time-consuming process of kneading the dough. Instead, gluten is developed over a long rise, the protein strands aligning naturally due to the high water content of the dough. Unfortunately, the wetness of the dough made it difficult to fold and shape as specified, requiring a lot of additional flour, and made it challenging to get into the baking vessel safely1. The dough also spread out very easily, resulting in a flat, wide loaf, more like a ciabatta than a traditional domed boule.

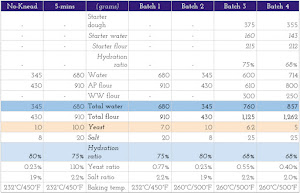
Hydration ratio - the ratio of water ( and other liquids) to flour, by weight - for No-Knead Bread is 80%. Another popular bread recipe, from The New Artisan Bread in Five Minutes a Day, also relies on moisture, with a 75% hydration ratio. This dough is more stable that No-Knead Bread, but remains difficult to shape, and requires a well-floured counter and hands.

Several weeks of experimentation2 with various hydration ratios, flours and baking temperatures have resulted in a recipe which produces a delicious, chewy loaf, with a rustic, open crumb and a crisp crust. There is still no kneading involved, and with the right tools, no additional flour is required after the dough is mixed.

Mr. Lahey's technique ingeniously allows home bakers to replicate the moist environment of mist-injecting commercial ovens. Baking in a sealed, preheated vessel traps steam around the loaf, ensuring a shatteringly crisp crust and a soft, chewy interior. I use a round, 3.5-quart Le Creuset Dutch oven; any ovenproof, lidded vessel will work, as long as it can withstand 260°C / 500°F.


There are several additional pieces of equipment which simplify the process.
  • Silpat baking mat - this flexible baking mat is non-stick, and makes it possible to fold and shape the dough without any additional flour. It is also great for baking cookies, and absolutely indispensable for making tuiles and lacy Parmesan frico.
  • Dough scraper - facilitates folding and flipping the dough, while keeping your hands clean. Can be used to divide dough (in this and other recipes), scrape down sides of the bowl when mixing batters, and to corral and transfer finely chopped ingredients.
  • Digital scale - extremely helpful for accurately portioning the ingredients. There is no standard for measuring cups and spoons, and the difference an be as much 25% by weight. Flour weight vs. volume varies depending on how the flour is added to the measuring cup; kosher and table salts have different volumes for the same mass. A digital scale simplifies the measuring process. However, it is not indispensable for a successful loaf - the recipe contains notes for a preparation without a scale.

Lazy loaf
☙ ☙ ☙ 2016.12.26 update: After nine months of baking at least two loaves a week, and continued experimentation, the yeast has been reduced to 1 gram / ¼ teaspoon, and first rise extended to 24 hours. The longer rise also develops deeper flavor, so the dough is ready to bake immediately, skipping the refrigerated rise. Loaf size has been increased to 800 grams, reducing recipe yield to two loaves. And during the summer, I was gifted the best vessel for baking bread - a Brazilian soapstone pot. If you are planning to bake bread regularly, it is well-worth the investment. ☙ ☙ ☙

This is a lazy recipe, but not a quick one. Mix the dough in the morning, and leave to rise during the day. Refrigerate overnight, and it will be ready to bake by lunchtime the following day.

The dough can be refrigerated for up to two weeks. As the dough ages, it develops a light sourdough flavor, making the bread taste more complex and delicious. A small amount of leftover dough can be used as a erzats starter for the next batch (I have not washed my dough container since the first batch, five weeks ago).

Makes three 500-gram / 1.1-pound loaves, with some aged dough remaining to flavor the next batch.
•   1,000 grams
•   680 grams
•    5 grams
•   20 grams
/ 35.25 ounces (2.2 lbs) All-Purpose (AP) white flour
/ 24 ounces water
/ 0.18 ounces active dry yeast
/ 0.71 ounces salt
Optional - ¼ Cup cornmeal, wheat bran or instant oatmeal for dusting.

If a digital scale is not available, measure as follows:
•   8⅓ cups AP white flour, using the spoon-and-level method
•   3 Cups water
•   1¼ teaspoons active dry yeast
•   1¼ Tablespoons kosher salt (reduce to 1 Tablespoon for table salt)

Any container can be used for proofing the dough. It should be large enough to to accommodate the rise - expect the dough to grow two to three times its original volume. I have recycled a 1-gallon (~4 liter), plastic, lidded kimchi container3, which is just big enough. For those with lower rates of kimchi consumption, similar containers can be purchased for less than the cost of fancy coffee beverage. It is convenient to track various dough iterations by making notes on the lid with a Sharpie; when starting a new batch, the old notes wipe off with a little rubbing alcohol.

In the absence of a lidded container, any large bowl will do; if available, cover the bowl with a new plastic shower cap instead of plastic wrap. The shower cap will not accidentally form an air-tight seal, and it is much easier to reuse.

Combine flour, yeast and salt in the container; stir to combine. Add the water, and mix using a spoon, fork or your hands. This is the most labor-intensive part of the process. The relatively low hydration ratio means the dough will initially feel dry and stiff. Mix just until just combined, and there are no obvious large pockets of flour left.

For subsequent batches, if using leftover aged dough, reverse the order of dry and wet ingredients. First, add water to the starter dough and mix well (a stick blender works wonders). Add the flour, yeast and salt, and proceed as directed.


Cover the container with a lid; do not form an air-tight seal.
Leave to ferment at room temperature for 6-12 hours, until doubled in volume (the blue mark below shows the level of just-mixed dough). Total rise time will depend on the ambient room temperature, the freshness and overall feistiness of the yeast. The risen dough should have a pleasant, yeasty fragrance, and the sides and surface should be dotted with lots of small bubbles.

After the initial rise, refrigerate the dough for at least 8 hours. Refrigerated, the dough will keep for up to two weeks, rising very slowly and developing a more complex flavor as it ages.

After the 8-hour (or longer) refrigerated rise, bring out the dough. Place the Silpat mat (or parchment paper) on a baking sheet - this helps contain stray bits of dough and eliminates countertop cleaning. If not using a non-stick mat, generously flour the baking sheet or counter.

Carefully scoop out (with wet hands or a dough scraper) a piece of dough the size of a very large grapefruit. If using a digital scale for precise portioning, measure out 500 grams/18 ounces (1.1lbs). Try to remove the dough in a single piece, without damaging the gluten strands or compacting the dough too much.

Return the remaining dough, still loosely covered, to the refrigerator.
Cover the portioned dough with an inverted mixing bowl or a piece of plastic wrap, and let rest at room temperature for 15-20 minutes.

After the dough has warmed up, perform the first folding. Using wet hands or the dough scraper (dry, well-floured hands if working on a floured surface), fold the dough in on itself, going around the perimeter to make a rough ball. Flip the dough seam side down, cover again and let rise for 2 hours. For best crumb texture, repeat the fold and flip every 30 minutes. These additional folds are not critical, and can be skipped during the rise.


After 2 hours, fold and flip the dough. Cover, and let rest while the oven is preheating.

Safety note: Make sure all parts of the baking vessel are rated to the specified baking temperature. If using a classic Le Creuset pot, it is important to replace4 or remove the lid knob, as it is only rated to 190°C / 375°F. It is not advisable to reduce the baking temperature5, as this will affect the crust formation and oven spring - the dramatic expansion of a loaf as the yeast reacts to its new, hot environment with a final, frantic burst of fermentation.

Place the baking vessel in a cold oven, keeping the bottom and lid separate. It is easiest to put both pieces side by side on a baking sheet. Preheat the oven to 260°C / 500°F; once the temperature is reached, allow the baking vessel to continue heating for another 5-10 minutes.

When the oven is fully heated, fold and flip over the dough - the seams from the folds should be on the bottom.

With wet hands (dry and floured if not using a Silpat mat), gently cup the dough with the edges of your palms, and, without lifting, rotate in one direction. The surface tension on the bottom will pull the dough in on itself; continue to rotate until the dough forms a sphere. Be careful not to press the dough too hard and deflate the CO2 bubbles. The dough should be rotated at least 7 full turns, and form a fairly tight ball.


If using, sprinkle the top liberally with ¼ Cup wheat bran, cornmeal or instant oatmeal.

Place your hand under the Silpat mat (or scoop up the dough) and working quickly, open the oven, flip the dough into the baking vessel, with the seams from the fold now on top. Put on the lid - don't forget the oven mitt! - close the oven, and set the timer for 20 minutes.

After 20 minutes, remove the lid, and reduce the oven temperature to 232°C / 450°F. Continue baking for another 15-20 minutes, until the top is nicely browned and internal temperature reaches 88°C / 190°F. If you don't have an instant-read thermometer, take out the loaf, and carefully tap the bottom - it should sound hollow. Exact baking time is difficult to specify, as it will depend on the material of the baking vessel, size of the loaf and temperament of the oven.


Cool the bread on a wire rack, and resist the temptation to tear into a hot loaf - it will crush the bread out of shape, and interfere with the final stage of flavor and texture development.


Baker's notes
Below are some observations on the ingredients and techniques collected over several weeks of experimentation.

Yeast
Although baking is considered a precise science - more chemistry that cooking - bread dough is surprisingly flexible. The yeast-to-flour ratio can vary by a factor of four without detrimental effect. What will change is how fast the dough proofs, and the complexity of flavor that develops. Lower yeast percentage means a slower rise and a more interesting flavor; more yeast creates a faster rise and a blander bread. Use at least 2 grams of yeast per 1,000 grams of flour; increase the proofing time proportionally.

The original No-Knead Bread recipe called for instant yeast. It doesn't really matter which type of dry yeast is used - the long proofing time ensures a good rise. The standard conversion is 1 gram instant to 1.35 grams active dry yeast. If using cake (fresh) yeast, increase the weight to 2.7 grams of cake for every gram of instant yeast.

Water
The hydration ratio can be tweaked to achieve desired texture. The lower the ratio, and drier the dough, the more dense and tight the crumb (e.g. bagels); higher water content results in a more open crumb (e. g. baguettes, ciabatta). While wetter dough gives a more rough and airy interior, it also makes it more difficult to shape the dough, and the final loaf will not rise as high, or have a well-defined dome.

Flour
Flour choice will also affect the look and texture of the bread. Regular, white all-purpose (AP) flour will produce a shiny, hard crust and open crumb. Replacing some of the AP flour with whole wheat flour will give the bread a pleasantly bitter, nutty flavor, but the oils in the wheat germ will also interfere with crust formation, making it softer. Whole wheat flour also produces a denser loaf with a tighter crumb texture. Replace 30% of the white flour with whole wheat to start, and increase or decrease depending on how much you like the result.

Important note: Adding whole wheat flour to the dough also makes it more perishable - use the dough within 1 week.

Stone-ground flour will give a more rustic appearance to the loaf. It is also more hydroscopic - if the dough is too dry and difficult to mix, add a Tablespoon or two of water.6

On the left: 70% AP - 30% whole wheat flour; 68% hydration ratio. On the right: 100% AP flour, 80% hydration ratio.

Toppings and mix-ins
If desired, sprinkle the top with sesame seeds, sunflower seeds or poppy seeds after dropping the bread dough into the preheated baking vessel.

To bake flavored bread - raisin-nut, olive, sunflower seed - do not fold after the initial resting period. Instead, sprinkle the dough with ½ Cup of the desired filling. Roll up the dough, fold the ends of the roll to the center, and flip. After resting for 30 minutes, perform a fold as instructed in the recipe (do not worry if the filling tears the dough a little). Folding at least twice more will ensure an even distribution.

Sandwich loaf
To make a sandwich loaf, pull off a 900 gram/ 32 ounce (2lbs) - the size of a melon - piece of dough. Follow the steps through the initial resting and folding as instructed in the recipe.

Grease a loaf pan with a neutral oil (grape seed, canola, rice bran) or coat with non-stick baking spray. Optionally, coat bottom and sides with cornmeal, wheat bran or instant oatmeal - add to the greased pan and shake around to cover the bottom and sides.
Shape the dough into an oblong, and drop carefully into the prepare loaf pan. Cover and let rise for 2 hours.
Before putting into the oven, slash the top with a knife or cut with scissors several times to prevent the crust from exploding.

A standard loaf pan should fit inside a 5-quart Dutch oven. If it is not possible to bake with the loaf pan inside a pre-heated Dutch oven, place two racks in the oven. On the bottom rack, place a roasting pan or another oven-proof vessel with two cups of boiling water - put the roasting pan in the oven first and then carefully add the water. Preheat the oven to 260°C / 500°F.

Once the oven is preheated, place the loaf pan with the dough on the top rack, and bake for 20 minutes. After 20 minutes, remove the roasting pan with water, and lower the heat to 232°C / 450°F. Bake for another 20-30 minutes, testing for doneness as specified in the recipe.


1 The problem may be in how the flour was measured. The original recipe calls for 3 cups of flour, but does not specify how to measure it. With the generally accepted spoon-and-level method, a cup of flour will weigh 120 grams/4.2 ounces, much less than the 430 grams/15.2 ounces specified in the amended recipe.
2 Yes, there is a spreadsheet.
3 Kimchi, Korea's national pickle, has over 180 officially recognized varieties. Most commonly served is 배추김치 - baechu kimchi - Napa (Chinese) cabbage fermented with Korean red pepper powder, garlic and salted shrimp. It is aggressively pungent, and the scent clings and lingers long after the kimchi is gone. To deodorize a plastic container, wash well with warm water and soap, and air-dry, preferably in direct sunlight. Stuff the container with crumpled newspapers, seal, and let sit for a day or two. If the smell persists, mix baking soda and warm water into a thick paste, and cover the interior of the container. Seal, and let sit for 24 hours to draw out embedded odors.
4 I have put the metal Staub knob on the lid of the Le Creuset pot; metal replacement knobs can be found on Amazon. A metal or wooden dresser pull might also work, although there are some concerns about chemicals which might be released during baking. It is also possible to simply remove the knob and fill the hole with a ball of aluminum foil, but this makes it more challenging to move the lid.
5 Although the original printed recipe specifies 232°C / 450°F, Mr. Lahey states 260°C / 500°F in the video. 260°C / 500°F is also given in both video and printed recipe via Martha Stewart.
6 Hertzberg, Jeff, and Zoë François. The New Artisan Bread in Five Minutes a Day: The Discovery That Revolutionizes Home Baking.

March 2, 2016

Gorgeous gradients

Art is pattern informed by sensibility.
~ Sir Herbert Edward Read
©Brittany Wright, Food Gradients 10
Many years ago, I read that when planting spring bulbs such as crocuses or daffodils, there was only one way to achieve the look of a “wild” flower bed - gather all the bulbs in a pail, gently upend over the area to be planted, and sow the bulbs where they fell. Planting the flowers individually to create a natural-looking, random design would be an exercise in frustration. Despite best efforts, the human mind seeks order and creates patterns, whether we wish it to or not.

This longing for order might explain the joy found in minute, daily acts of pattern-making, in sorting and arranging any collection that is disparate in color or size. Grouping gummy bears by color and forming a “rainbow”; grading berries by ripeness and eating from the worst to the best - I enjoyed doing this as a child, and I still occasionally indulge in the desire to reduce universal entropy.

©Brittany Wright, Food Gradients 8
Ms. Brittany Wright, of Wright Kitchen, has turned the simple joy of orderly patterns into glorious art. Ms. Wright‘s photographs, painstakingly arranged, showcase nature's riot of colors balanced in perfect counterpoint to man's desire for order.

©Brittany Wright, Tomato Gradients v.2
©Brittany Wright, Tomato Gradients v.1
©Brittany Wright, Food Gradient 4
Subjects reappear in different compositions, and, when grouped thematically (tomatoes, leafy greens), it is easy to find a pair or even trio of complementary images.

©Brittany Wright, Rainbow Shard Gradients
©Brittany Wright, Food Gradients 5

The photos would make a gorgeous gift for someone who loves to cook (or eat!).

©Brittany Wright, Laughing Cow Cheese

Several would make a fun addition to a child's room, and any one of them would create a joyful burst of color to any decor1.

©Brittany Wright, Blueberry Gradients

©Brittany Wright, Melted Popsicle Gradients

Ms. Wright2 sells prints of her work starting at 60 dollars. To peruse the complete portfolio, visit her website or follow her on Instagram.

©Brittany Wright, Carrot Gradients


1For maximum visual impact, use a much larger white frame with a wide mat.
2I am not compensated to promote Ms. Wright's work, nor do I know her personally.

February 21, 2016

Spicy cucumber salad

         They taste like burning!
                      ~ Ralph Wiggum, The Simpsons: Das Bus


A cucumber salad might seem like an odd choice for a winter recipe. Defense offers the following arguments: firstly, that the dressing offers enough heat ward off even a severe chill; secondly, as the forecast is oscillating between frostbite inducing -25°C/-13°F and a balmy +12°C/54°F, waiting a few days will likely produce cucumber salad-appropriate temperatures; thirdly, the salad is so delicious it will make you forget all about the weather.

I first encountered this dish at the Han Dynasty restaurant on New York's Upper West Side. Han's specializes in Sichuan dishes, and the salad is traditionally served as a cooling accompaniment to the fiery cuisine of the region. Despite my repeated entreaties, the restaurant declined to share the dressing's secret recipe. After spending some time testing various ingredient options and proportions, I have come up with something that, while not a perfect facsimile, makes a really tasty salad.

The dish offers a really great flavor balance. The cool crunch of the cucumber is offset by the spicy, pungent dressing. The acidity of vinegar is mitigated with a hint of sweetness, and sesame seed oil offers a hit of smokiness and marries the flavors together. The dressing is so good that any remainder is invariably eaten with spoon after all the cucumber slices are gone.

I don't dare call this Sichuan cucumber salad, since it lacks the traditional Sichuan peppercorns and Chinese black vinegar. Instead, the dressing uses ingredients that are likely already in your pantry (and are relatively easy to find), and can be used in a variety of other dishes. If you have Chinese black vinegar in stock, by all means use it instead, and omit the sugar.


Spicy cucumber salad
2 to 4 servings
  • 1 English hothouse or 2 slicing cucumbers (around 1 pound/500 grams)
  • 2 teaspoons regular table salt
If using regular slicing cucumbers, which tend to have tough skin, peel them. If using English hothouse cucumber, no need to peel. Cut each cucumber in half lengthwise, and scoop out the seeds with a small spoon.


Place the cucumbers cut side down on the cutting board, and whack with the flat side of the knife (the blade edge facing away, please). Do not hit so hard that the vegetables are pulverized, but use enough force to flatten the cucumber halves into long spears. Smashing increases the surface area, speeding up flavor absorption.
Slice the spears into half-inch (1cm) pieces.


Toss the cucumbers with salt, stir, and place in a colander set over a bowl to drain. Salting and straining firms up and seasons the cucumber flesh. Place in the refrigerator and leave for at least 15 minutes.


While the cucumbers are crisping up, prepare the dressing.

An important note on chili peppers. The dried arbol chilis in the photos have a spice rating of 10-30K Scoville heat units (SHUs), falling on the milder end of the spicy-heat spectrum. Cayenne peppers have a rating of 30-50K SHUs and bird's eye (Thai) chilis pack 100-20K SHUs. Since the Scoville rating is based on identical mass, it is possible to use a spicier pepper in the recipe by using less of it. Removing the ribs and seeds will reduce intensity of the pepper (the seeds are not spicy themselves, but are coated in capsaicinoids, the chemical compounds responsible for sensation of spice). If using a bird's eye chili, I would recommend starting with just one.

Dressing
  • 1 large or 2 small cloves garlic, peeled
  • 3 dried arbol chilis or 1 fresh cayenne pepper
  • 2 Tablespoons sesame oil
  • 2 Tablespoons rice vinegar
  • 2 teaspoons sugar
  • 1 teaspoon soy sauce


Finely mince or grate the garlic cloves.
If using dried chilies, break into large flakes, and discard the seeds. If using fresh pepper, wash and slice into thin rounds.

Place the sesame seed oil and chilis into a small saucepan and set over medium low heat. If the chilis start to brown, reduce the heat to low. Infuse, stirring occasionally, until small bubbles form around the edges of the pan and the chili pieces, 2-3 minutes. Remove from heat and stir in the garlic. After 30 seconds, the garlic should release its aroma but not change color.

Return the saucepan to heat and add the rice vinegar, sugar and soy sauce. Stir until the sugar is completely dissolved, another 30 seconds or so. Remove from heat and set aside to cool. The dressing should be a dark amber color, redolent of chilis and piquant with garlic.


Once the dressing cools to room temperature, assemble the salad. Combine the cucumbers and the dressing in a bowl; mix well, cover and refrigerate for 15 minutes. Stir well before serving.


The salad is an excellent accompaniment to almost any protein, especially heavier cuts such as ribs or pork belly. The spiciness of the dressing cuts through the fattiness of the meat, and the cool, crisp cucumber offers a pleasing palate cleanser. It would also be fantastic with grilled salmon or roast chicken.

The salad does not keep very well, as the cucumbers lose their crisp texture. It is possible to prepare extra dressing in advance and refrigerate it in an airtight glass jar for a few days. Remember, the garlic flavor will gain potency over time. Take the dressing out of the refrigerator to warm up while the cucumbers are straining.

Pantry note: While fresh chilis will look more attractive in the salad, it is expensive to buy 1 pepper at a time, and buying in bulk often produces one or two great dishes plus a bag of moldy chilis. It is more economical to buy a large package of dried chilis and keep it in the refrigerator. Arbol chilis, which offer moderate heat, work well in a variety of cuisines, and it is very easy to turn whole dried peppers into large flakes or chili powder, as needed.

May 16, 2015

Great graphics: Pop Chart Lab

A popular Introduction to Psychology textbook challenges the reader to memorize a string of letters:

C I A N S A K G B F B I D O J

This is a difficult task for most people – the 15-letter string exceeds the magical number seven 1 rule for information processing. However, when shown the following string:

CIA NSA KGB FBI DOJ

most people are able to recall it perfectly after a very short period of time. The information is exactly the same; it is the relationship between the reader and the data that has changed. Visual design matters.

The human mind is capable of processing, very quickly, a large volume of complex information – if it is presented in the right way. Charles Joseph Minard's visualization of Napoleon's disastrous 1812 Russia campaign is a great example of proper presentation. Edward Tufte2 has called it ”the best statistical graph ever drawn”3.


The graphic communicates, simultaneously, the size of Napoleon’s invading force, its geographic position and direction of movement, and the recorded temperature. The brilliant visual design ensures that complex, interlinked variables are immediately and intuitively interpreted as a cohesive whole.

Great graphic design does not have to be limited to serious topics – in addition to being informative, it can be amusing, beautiful, decorative, irreverent, witty – ideally, all of the above. Pop Chart Lab, a design collaborative, has produced some of my favorite examples of exactly this kind of graphic design.

For the literary connoisseur with a pop-culture streak, Pop Chart Lab offers The Cocktail Chart of Film & Literature, featuring classics such as the whiskey sour and the cosmopolitan, as well as the more recent additions to the blended beverage repertoire.


The design is clean, almost stark, with limited colors and streamlined graphics. At the same time, the visuals convey a plethora of information – the name of the featured drink, its native novel or film, the character imbibing the concoction, ingredients and their measures, the appropriate serving glass and even the recommended garnish.

The overall design is a stylized film script, the abstracted stack of pages in ”double blue” ( the color-code for the final script) held together by the three brass split pins. A script is the intermediate phase in the metamorphosis of a novel into film – a toast to all the great cocktails immortalized on the Silver Screen.


For those interested in all things typographical, Pop Chart Lab has devised the Alphabet of Typography.

Colorful enough to suit a child's room - the visual cleverly features the four typographical inks (magenta, cyan, yellow and black) - it is sophisticated enough to grace the home of a font-obsessed adult.


For the architecture aficionado, Splendid Structure of New York City offers a virtual tour of the city’s most significant landmarks.

Rendered in beautiful detail, the blueprint design perfectly complements the subject matter. The various buildings are immediately recognizable; each one is shown to scale relative to its neighbors, and indicates its street address, height, date of construction, architectural style and location in the city.


Design a walking tour that illustrates the changing façade of New York over time, focus on a favorite style, or concentrate on a particular neighborhood - all with the assistance of a single page. Landmarks of world renown share the visual real estate with important but more obscure structures, helping to avoid the bane of the curious traveler - getting home after a trip and realizing that you were within walking distance of a hidden treasure and did not know it.

As a decorative element, posters often suffer from an unfavorable perception of immaturity; an object best reserved for college dorm rooms. This is both unfair and impractical - not everyone can afford original art, even from a lesser-know artist. More importantly, a beautiful poster is art in its own right. The key to a fabulous poster presentation lies, unsurprisingly, in how the poster is framed - you need to create the right context for the viewer. Choose a quality frame with a wide mat - this immediately draws the eye to the artwork and creates a lot of negative space, elevating and enhancing the visual experience.

Custom frames can be extremely expensive - for the graphics sold by Pop Chart Lab, a custom frame can easily cost several hundred dollars. This is where Ikea provides a beautiful and affordable solution. The Ribba series offers a frame in a 19¾ x 27½ inch (50x70cm) size, available in a range of colors and finishes. The frame includes a mat, and is perfect for framing an 18x24 poster. The local framing shop should be willing to cut the enclosed mat to the right size for your chosen graphic (mine did it for free), or order a custom mat in a contrasting or complementary color, creating a bespoke look for the fraction of the price.

For the Splendid Structure of New York City, I suggest the Ribba frame in glossy grey. The neutral color anchors the graphics and enhances the blueprint look.


For the Alphabet of Typography, the Ribba frame in glossy red echos the graphic's bursts of primary color. The bold color choice is also in line with the subject matter - a well-designed font should grab your attention.


For The Cocktail Chart of Film & Literature, the brushed aluminum Ribba frame subtly references the finish of a cocktail shaker. Alternatively, a white frame provides a clean and modern look.


To forestall any potential frustration and disappointment, it is worth mentioning that Ikea's product selection varies by country. If your preferred frame color is not available, purchase the aluminum frame (available in most markets) and paint it with an enamel spray paint in the desired color.

As a small design bonus, Pop Chart Lab has created the (possibly) only greeting card you would ever need (click image to enlarge).


Suitable for all occasions, it offers a total of 276 different felicitations in a single card. I find especially thoughtful (and amusing) the inclusion of less positive sentiments.


Interested in the minute details of great visual design? Through June 3rd, 2015, the Ladislav Sutnar: Visual Design in Action - Facsimile Edition project is looking for funding on Kickstarter. Sutnar is one of the lost masters of graphic design, a pioneer of data visualization, the man responsible for the now ubiquitous parenthesis framing the area codes in US phone numbers. 5


1 Miller, G. A. ”The magical number seven, plus or minus two: Some limits on our capacity for processing information.” Psychological Review 63(1956): 81–97.
2 Edward Tufte is a guru of visual design, a staunch critic of PowerPoint charts (the use of PowerPoint format may be inadvertently responsible for the Space Shuttle Columbia explosion) and a great proponent of graphics that are both useful and beautiful.
3 Cookson, Clive. ”Edward Tufte” FT Magazine 26 Jul. 2013
4 Translation of text:
Figurative Map of the successive losses in men of the French Army in the Russian campaign 1812-1813.
Drawn by Mr. Minard, Inspector General of Bridges and Roads in retirement. Paris, 20 November 1869.
The numbers of men present are represented by the widths of the colored zones in a rate of one millimeter for ten thousand men; these are also written beside the zones. Red designates men moving into Russia, black those on retreat.
The informations used for drawing the map were taken from the works of Messrs. Chiers, de Ségur, de Fezensac, de Chambray and the unpublished diary of Jacob, pharmacist of the Army since 28 October.
In order to facilitate the judgement of the eye regarding the diminution of the army, I supposed that the troops under Prince Jèrôme and under Marshal Davoust, who were sent to Minsk and Mobilow and who rejoined near Orscha and Witebsk, had always marched with the army.
5 Stinson, Liz. ”Master designer who gave the area code its parentheses.” Wired 6 May 2015