Recent posts with visuals

May 16, 2015

Great graphics: Pop Chart Lab

A popular Introduction to Psychology textbook challenges the reader to memorize a string of letters:

C I A N S A K G B F B I D O J

This is a difficult task for most people – the 15-letter string exceeds the magical number seven 1 rule for information processing. However, when shown the following string:

CIA NSA KGB FBI DOJ

most people are able to recall it perfectly after a very short period of time. The information is exactly the same; it is the relationship between the reader and the data that has changed. Visual design matters.

The human mind is capable of processing, very quickly, a large volume of complex information – if it is presented in the right way. Charles Joseph Minard's visualization of Napoleon's disastrous 1812 Russia campaign is a great example of proper presentation. Edward Tufte2 has called it ”the best statistical graph ever drawn”3.


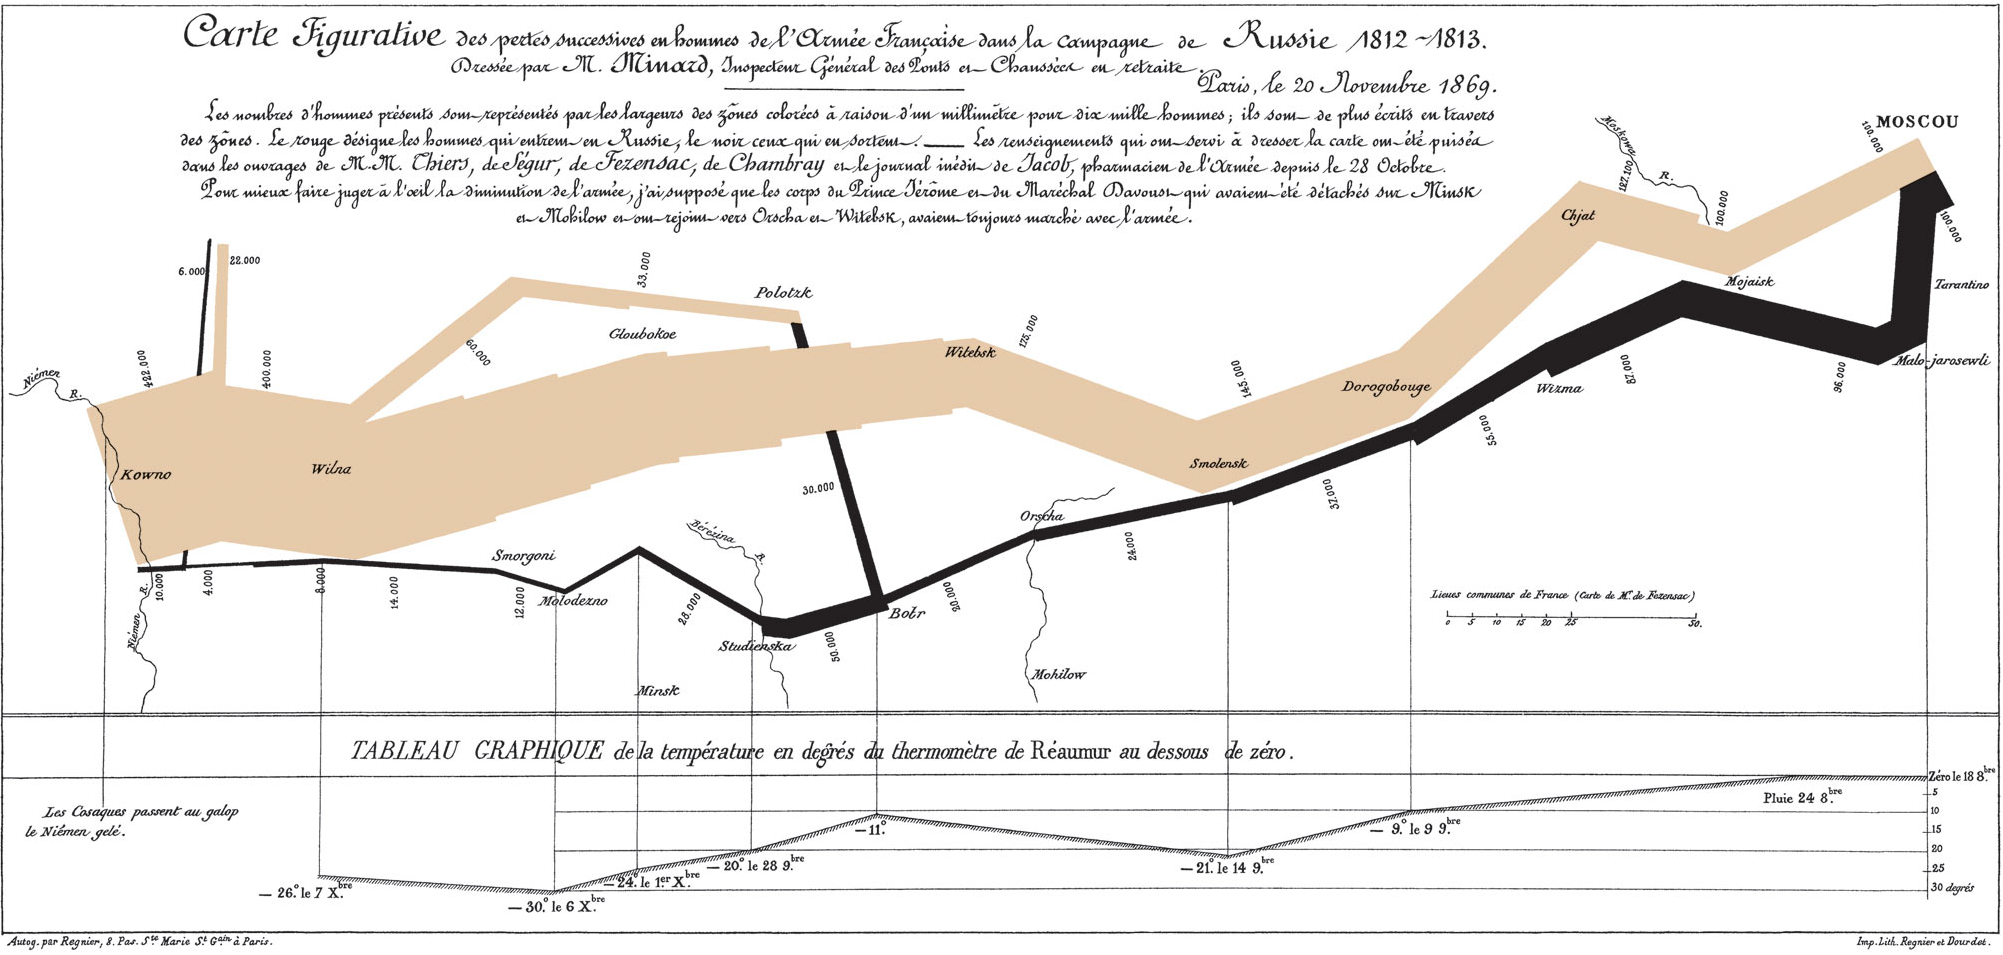
The graphic communicates, simultaneously, the size of Napoleon’s invading force, its geographic position and direction of movement, and the recorded temperature. The brilliant visual design ensures that complex, interlinked variables are immediately and intuitively interpreted as a cohesive whole.

Great graphic design does not have to be limited to serious topics – in addition to being informative, it can be amusing, beautiful, decorative, irreverent, witty – ideally, all of the above. Pop Chart Lab, a design collaborative, has produced some of my favorite examples of exactly this kind of graphic design.

For the literary connoisseur with a pop-culture streak, Pop Chart Lab offers The Cocktail Chart of Film & Literature, featuring classics such as the whiskey sour and the cosmopolitan, as well as the more recent additions to the blended beverage repertoire.


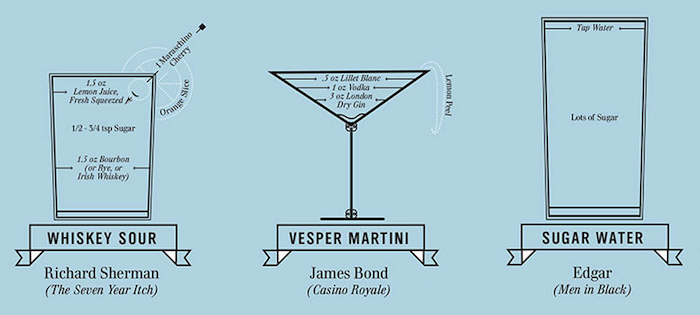
The design is clean, almost stark, with limited colors and streamlined graphics. At the same time, the visuals convey a plethora of information – the name of the featured drink, its native novel or film, the character imbibing the concoction, ingredients and their measures, the appropriate serving glass and even the recommended garnish.

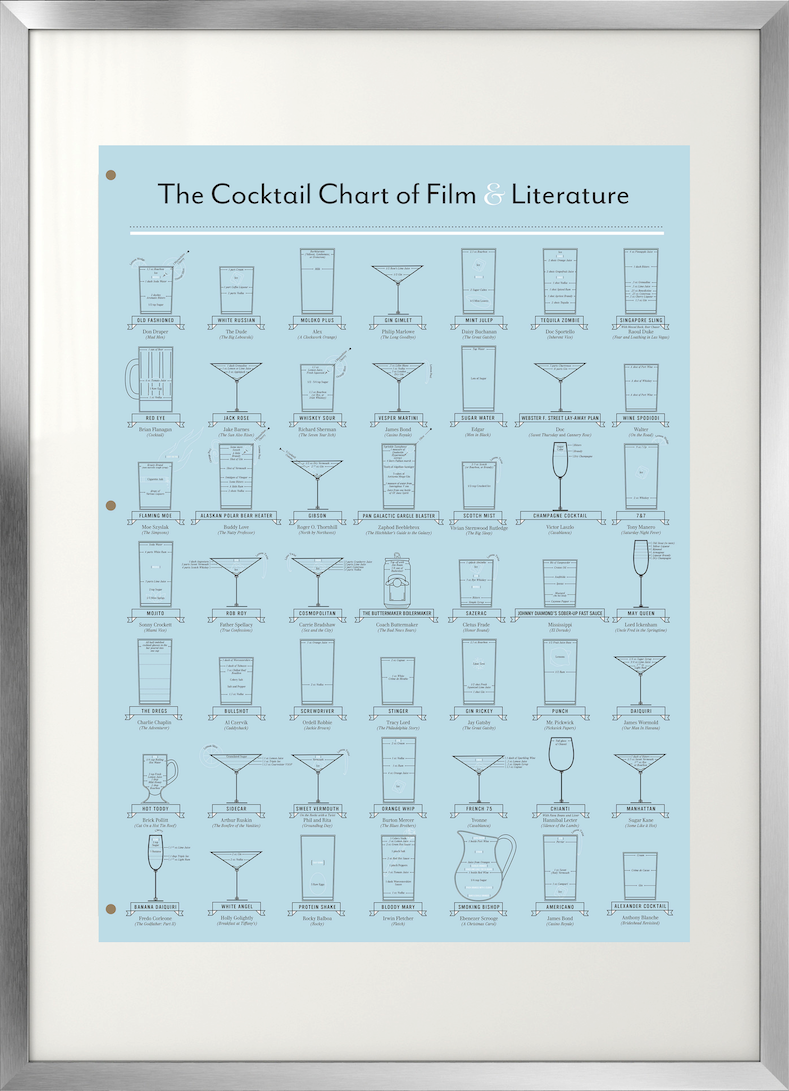
The overall design is a stylized film script, the abstracted stack of pages in ”double blue” ( the color-code for the final script) held together by the three brass split pins. A script is the intermediate phase in the metamorphosis of a novel into film – a toast to all the great cocktails immortalized on the Silver Screen.


For those interested in all things typographical, Pop Chart Lab has devised the Alphabet of Typography.

Colorful enough to suit a child's room - the visual cleverly features the four typographical inks (magenta, cyan, yellow and black) - it is sophisticated enough to grace the home of a font-obsessed adult.


For the architecture aficionado, Splendid Structure of New York City offers a virtual tour of the city’s most significant landmarks.

Rendered in beautiful detail, the blueprint design perfectly complements the subject matter. The various buildings are immediately recognizable; each one is shown to scale relative to its neighbors, and indicates its street address, height, date of construction, architectural style and location in the city.


Design a walking tour that illustrates the changing façade of New York over time, focus on a favorite style, or concentrate on a particular neighborhood - all with the assistance of a single page. Landmarks of world renown share the visual real estate with important but more obscure structures, helping to avoid the bane of the curious traveler - getting home after a trip and realizing that you were within walking distance of a hidden treasure and did not know it.

As a decorative element, posters often suffer from an unfavorable perception of immaturity; an object best reserved for college dorm rooms. This is both unfair and impractical - not everyone can afford original art, even from a lesser-know artist. More importantly, a beautiful poster is art in its own right. The key to a fabulous poster presentation lies, unsurprisingly, in how the poster is framed - you need to create the right context for the viewer. Choose a quality frame with a wide mat - this immediately draws the eye to the artwork and creates a lot of negative space, elevating and enhancing the visual experience.

Custom frames can be extremely expensive - for the graphics sold by Pop Chart Lab, a custom frame can easily cost several hundred dollars. This is where Ikea provides a beautiful and affordable solution. The Ribba series offers a frame in a 19¾ x 27½ inch (50x70cm) size, available in a range of colors and finishes. The frame includes a mat, and is perfect for framing an 18x24 poster. The local framing shop should be willing to cut the enclosed mat to the right size for your chosen graphic (mine did it for free), or order a custom mat in a contrasting or complementary color, creating a bespoke look for the fraction of the price.

For the Splendid Structure of New York City, I suggest the Ribba frame in glossy grey. The neutral color anchors the graphics and enhances the blueprint look.


For the Alphabet of Typography, the Ribba frame in glossy red echos the graphic's bursts of primary color. The bold color choice is also in line with the subject matter - a well-designed font should grab your attention.


For The Cocktail Chart of Film & Literature, the brushed aluminum Ribba frame subtly references the finish of a cocktail shaker. Alternatively, a white frame provides a clean and modern look.


To forestall any potential frustration and disappointment, it is worth mentioning that Ikea's product selection varies by country. If your preferred frame color is not available, purchase the aluminum frame (available in most markets) and paint it with an enamel spray paint in the desired color.

As a small design bonus, Pop Chart Lab has created the (possibly) only greeting card you would ever need (click image to enlarge).


Suitable for all occasions, it offers a total of 276 different felicitations in a single card. I find especially thoughtful (and amusing) the inclusion of less positive sentiments.


Interested in the minute details of great visual design? Through June 3rd, 2015, the Ladislav Sutnar: Visual Design in Action - Facsimile Edition project is looking for funding on Kickstarter. Sutnar is one of the lost masters of graphic design, a pioneer of data visualization, the man responsible for the now ubiquitous parenthesis framing the area codes in US phone numbers. 5


1 Miller, G. A. ”The magical number seven, plus or minus two: Some limits on our capacity for processing information.” Psychological Review 63(1956): 81–97.
2 Edward Tufte is a guru of visual design, a staunch critic of PowerPoint charts (the use of PowerPoint format may be inadvertently responsible for the Space Shuttle Columbia explosion) and a great proponent of graphics that are both useful and beautiful.
3 Cookson, Clive. ”Edward Tufte” FT Magazine 26 Jul. 2013
4 Translation of text:
Figurative Map of the successive losses in men of the French Army in the Russian campaign 1812-1813.
Drawn by Mr. Minard, Inspector General of Bridges and Roads in retirement. Paris, 20 November 1869.
The numbers of men present are represented by the widths of the colored zones in a rate of one millimeter for ten thousand men; these are also written beside the zones. Red designates men moving into Russia, black those on retreat.
The informations used for drawing the map were taken from the works of Messrs. Chiers, de Ségur, de Fezensac, de Chambray and the unpublished diary of Jacob, pharmacist of the Army since 28 October.
In order to facilitate the judgement of the eye regarding the diminution of the army, I supposed that the troops under Prince Jèrôme and under Marshal Davoust, who were sent to Minsk and Mobilow and who rejoined near Orscha and Witebsk, had always marched with the army.
5 Stinson, Liz. ”Master designer who gave the area code its parentheses.” Wired 6 May 2015

May 8, 2015

Bouillon with spring vegetables, mint

            The very smell of mint reanimates the spirits, and its flavour gives a remarkable zest to food.
~ Pliny the Elder, Natural History

Spring brings with it a kaleidoscope of flowers, young leaves in every shade of green and the first produce of the year – asparagus, peas and tender fresh herbs. It also often brings cold thunderstorms (occasionally featuring hail), and chilly, foggy evenings - in other words, perfect soup weather. Not a winter soup, laden with meat, robust legumes and earthy root vegetables. Rather, a spring soup, soothing yet light – a cashmere throw instead of a hefty eiderdown comforter.

This recipe was inspired by a recent meal at Le Comptoir, one of my favorite restaurants in Paris. The addition of mint brings an unexpected burst of flavor to the broth, a riff on a classic combination of mint and lamb. In fact, the soup features two quintessential mint pairings – mint & meat and mint & peas.

Bouillon with spring vegetables and mint
The recipe is very easy, although it does consist of several steps. Most of the components may (or, indeed, must) be prepared in advance; final assembly takes less than 10 minutes.
Serves 2
  • 2½ Cups home-made chicken stock (roasted or otherwise)
  • 6-7 stalks of asparagus
  • 3-4 scallions
  • ½-1 Cup green peas (frozen or fresh)
  • 5 fresh mint leaves
  • ½ Tablespoon (or less) neutral oil – rice bran, canola, grape-seed, light olive
  • Kosher salt
Clarify the stock
While not essential, this step makes for a more attractive presentation and an ethereal-tasting bouillon.
Freeze the stock in an ice-cube tray, muffin tin or a Ziplock bag placed flat in the freezer. Once frozen, place the stock cubes (if using a Ziploc bag, break into smaller pieces first) in a strainer lined with a coffee filter or a paper towel. Put on the counter (or in the refrigerator) to slowly thaw. The gentle melting process will result in a crystal clear stock, leaving behind the sediment which gives stock a cloudy appearance.
This bouillon would also work beautifully for floating some lovely ravioli.
N.B. Do not re-freeze previously frozen stock.

Prepare the peas
If using frozen peas, take out of the freezer, run under cool water and set in colander to thaw. If using fresh peas, shell the peas.

Roast the vegetables
Preheat the oven to 425°F/220°C (400°F/205°C for convection oven).
Wash the asparagus and scallions. Trim the roots and bright green tops from the scallions and peel off the first leaf (it is usually wilted and papery). Hold an asparagus spear near the ends and gently bend – the point at which the spear will be ready to snap is where the tender part of the stalk becomes tough. Peel the woodier root end without snapping off, or remove and save for making stock.

Place the scallions and asparagus on a baking sheet, gently coat in oil (a pastry brush simplifies the job), and sprinkle liberally with salt. Roast for 12-15 minutes, until the scallions are completely soft and caramelized.

Remove from the oven, cool slightly1 and cut into bite-sized pieces.

This roasted asparagus and scallions preparation can also be used in other dishes. It makes an excellent pizza topping, a tasty filling for a quiche (add the peas as well) or a simple vegetable side (leave whole).

Final assembly
Wash and dry the mint leaves, stack them neatly, fold in half laterally and cut into thin strips. Kitchen scissors work marvelously here, reducing the effort of the traditional chiffonade technique – rolling the stacked leaves into a tiny, minty cigar, and cutting with a knife. (A tiny cigar is not an easy thing to hold while wielding a sharp knife!)

Gently heat the bouillon in a small pot; add the peas and cook until tender, 2-3 minutes. Be sure to keep the bouillon at a very gentle simmer – do not let it boil.

Add the sliced asparagus and scallions, and allow to heat through, another minute or so. Taste and adjust the seasoning if necessary. Divide the soup between 2 bowls, sprinkle with the mint and serve.

I find this is the best way to store asparagus if I am not using it immediately after purchase – trim off ¼ inch (1cm) off the root end, stand in a tall container with an inch or so of cold water, cover with a plastic bag (secure with a rubber band) and refrigerate.

1 Or cool completely, wrap in foil or place in a covered container, and refrigerate for up to 24 hours in advance. Slice right before final assembly.

May 3, 2015

Postcards from Paris: Le Comptoir

There is never any ending to Paris and the memory of each person who has lived in it differs from that of any other. We always returned to it no matter who we were or how it was changed or with what difficulties, or ease, it could be reached. Paris was always worth it and you received return for whatever you brought to it.
~ Ernest Hemingway, A Moveable Feast

I first stumbled across Le Comptoir by accident in 2006, less than a year after it opened. After a late, lazy start to the day and a leisurely amble thought the Jardin Luxemburg, I was slowly making my way to Boulevard Saint-Germain in search of a quick bite. The bistro looked unpretentious and cheerful, offering a view of the Odeon wisdom tree1 and the Les Editeurs facade across the square, and ample opportunity for people-watching (the French national pastime).


That first meal was simple - some beautiful bread, salad niçoise accompanied by a glass of white wine, and a chocolate pot de creme - but it was perfect. In the ensuing decade, every time I returned to Paris, I would strive to have at least one meal at Le Comptoir.


Chef Eric Ripert, that grand maestro of seafood, has described Le Comptoir as ”the perfect bistro” 2. During the day, the restaurant offers a brilliant, casual menu featuring some of the great French classics - œufs mayonnaise (deviled eggs) so good some patrons order them every day; plump escargots swimming in garlicky butter; generous slices of fois gras perfectly paired with sweet brioche toast and served alongside Little Gem lettuce dressed in the most delicious vinaigrette and garnished with fried shallots; an entire pig's foot, boned, stuffed, dredged in breadcrumbs and fried to achieve a crunchy, crispy crust, contrasting nicely with the tender, juicy flesh it encases.

Pied de porc désossé et pane, purée de pomme de terre
Several of charcuterie plates feature artisanal products made by chef Camdeborde's father, and the wine list is excellent.


The menu is completely recognizable as French bistro fare, and yet still manages to surprise. Roasted marrow bone is served with sweet pea puree and crowned with smoked lard foam; at least one soup on the menu combines the chewy, gelatinous texture of Japanese tapioca pearls with velvety smoothness of fois gras. One of the recent revelations was a bouillon served with vegetables and, surprsingly, mint. The presence of the herb in the broth was completely unexpected, and at the same time made immediate sense (and I am gleefully appropriating this idea for home cooking).


Even the oft-overlooked items are of a superb quality - the bread comes from Boulangerie Kayser on the next block, and the butter - from Jean-Yves Bordier - is a frontrunner for the title of ”the best butter in the world”.

The chocolate pot de creme that so impressed me on that long-ago first visit deserves a separate mention. It remains the smoothest, most luscious and intensely chocolate mousse I have ever had the pleasure of tasting, perfectly balancing lightness and richness. It would not surprise me in the least to learn that the pastry chef has struck some sort of an unholy bargain.

Quenelle de chocolat, éponge olive, crumble de cacao
On weeknight evenings, the bistro dons formal linens, and transforms into a gourmet restaurant. A reservation-only single seating offers diners a 5-course prix fixe chef's choice menu (including a fabulous all-you-can eat cheese board), that day's best ingredients transformed through the lens of the chef Camdeborde's vision.

Bouillon de poulpe et pois chiches au beurre noisette

Coquille Saint-Jacques de Normandie avec amande et citron

Bouillon clair de legumes, menthe et foie gras
I knew of chef Yves Camdeborde's stellar reputation as the owner-chef of La Regalade, but did not realize that he left it to pursue a new venture in the 6th, this time as a hotelier as well as a restauranteur. A classically trained chef, he has come through what has been aptly described as ”an ancient system of ruthless apprenticeships meant to identify, like incarnate lamas, the three or four godlike cooks born in every generation” 3. Chef Camdeborde left school to start his culinary training at 14, and apprenticed at some of the greatest temples of haute cuisine in Paris - the Ritz, the Relais Louis XIII, Tour d'Argent, and Les Ambassadeurs at the Hôtel de Crillon.

Concerned by the impact of the French recession on his prospects in the world of haute cuisine, he did something unprecedented - in 1992 he left the kitchen at the Crillion and opened La Regalade - a small, affordable bistro catering to a mix of neighborhood locals and visitors, and offering uncompromisingly fresh ingredients cooked with the technical expertise of a master. Seen as an incredible risk at the time, his endeavor revolutionized the Parisian culinary scene. Other classically trained chefs followed in his footsteps, forsaking positions in prestigious kitchens to open their own bistrots modernes.

As can only be expected at a restaurant offering incredible food at affordable prices, it has become increasingly difficult to reserve a table for the weekday dinner service. For a reservation during the high season (April - September), it is advisable to book at least four months in advance. Do not despair - it is possible to experience Le Comptoir even on short notice. The restaurant opens for lunch service at 12pm, and generally arriving 15-20 minutes before opening will ensure a table for the first seating. Bistro service continues until 5.30pm on weekdays (excluding holidays), and until 11pm on weekends (when the prix fixe dinner is not served). Alternatively, stop by once the lunch rush is over, sometime after 2.30pm. If you absolutely must experience the dinner, book a room at the adjacent Hôtel Relais Saint-Germain - it comes with a guaranteed table reservation.

Le Comptoir
6, Carrefour Odeon 75006
+33.(0)1.44.27.07.97
M: Odeon
Mon-Fri: 12pm - 5.30pm (à la carte bistro); 8.30pm reservation-only €60 prix fixe dinner (excluding holidays)
Sat-Sun: 12pm - 11pm (à la carte bistro)


1 Some artistic soul has decorated the tree with old textbooks. They look like secretive bats, or particularly unwieldy fruit, heavy with the weight of knowledge contained within.
2 Anthony Bourdain: No Reservations. Season 6, Episode 24: 100th Episode - Paris
3 Jeffrey Steingarten, The Man Who Ate Everything, Part Four: Hauts Bistros. This is a fantastic book. Humorous, well-researched, and incredibly insightful, my copy has traveled the world, been loaned to friends and bears copious notes.

April 30, 2015

The alchemy of sugar

A mountain of sugar is too much for one man. It's clear now why God portions it out in those tiny packets, and why he lives on a plantation in Hawaii.
~ Homer J. Simpson, The Simpsons: Lisa's Rival


There are two examples in contemporary culinary chemistry wherein a single ingredient is transformed through application of heat alone - toast and caramel. Bread (a complex recipe in itself) becomes toast, and sugar transmogrifies into caramel. Bread and its toasted form retain the same size and shape, although admittedly the color and flavor are not identical.

Sugar, on the other had, undergoes a true metamorphosis - there is nothing in caramel's appearance, texture or flavor that allows us to immediately pinpoint its origins. Like its progenitor, caramel is sweet, but it is a wild, almost feral sweetness - dark and layered, with hints of vanilla and almonds, edging slowly into bitterness with an almost imperceptible undercurrent of wood smoke. For something with such a complex character, caramel is surprisingly easy to make, requiring only sugar, a pan and some patience.

Caramel recipes are often intimidating, enumerating the various stages of sugar syrup and proclaiming a candy thermometer an indispensable tool. A variety of caramel sauces, nut brittle and even pulled sugar can be made based on color alone, keeping in mind that the longer the sugar cooks (and darker it becomes), the more pronounced the bitter notes. A rich amber color is a good starting point for the recipes below; carefully dip a clean spoon into the syrup once it turns a light amber, and repeatedly taste as it gets progressively darker to find your preferred flavor profile.

The type of cooking vessel is less critical than its shape - you can use a small frying pan, a skillet or a small pot. The key characteristic is straight (or expanding) sides, to facilitate evaporation and reduce the chance of sugar crystallizing. To promote even heating, look for a vessel with a heavy bottom.


A word of caution: sugar syrup boils at a much higher temperature than water, and can cause severe burns. Do not attempt to taste the caramel by sticking a finger into the bubbling syrup, no matter how enticing the smell. It is advisable to keep a bowl of ice water nearby, just in case.

Hazelnut brittle
Caramel can be made either dry or wet. The dry method is simply setting a pan of sugar over medium heat and waiting until the sugar starts to melt. The wet method begins with a combination of sugar and water, and cooks the syrup until all the water has evaporated. The process takes marginally longer, but may be more comfortable for the novice maker; it is my preferred approach in the following recipes.

Substitute almonds or pistachios if you prefer. Roasting raw hazelnuts (or almonds) dramatically improves flavor and aesthetic appeal.

Makes 2 large bars.
  • 1 Cup raw hazelnuts (filberts)
  • 1 Cup white granulated sugar
  • ½ (or less) Cup cold water
  • ½ teaspoon fleur de sel, sea salt or kosher salt
Prepare the hazelnuts.
Preheat the oven to 375°F/180°C. Place the hazelnuts on a baking sheet and roast for 12-15 minutes, shaking the tray once or twice, until the skins start to peel away and the exposed meat browns. Remove from the oven, wrap the hot hazelnuts in a folded tea towel and rub vigorously to remove as much of the skins as possible (or skip this step if feeling lazy).


Leave whole (more attractive presentation) or place the peeled hazelnuts (preferably while still warm) back on the tray and crush lightly by pressing down with a heavy-bottomed pot (more economical).

Line a large baking tray with parchment paper or a silicone baking mat. Rustic bars can be formed freehand directly on the tray, or use non-stick muffin liners, a silicone muffin form or loaf pan for neater edges. It is important the surface in contact with caramel be non-stick and flexible to ensure easy removal.
Place the prepared tray near the stove, and start the caramel.

Basic caramel
Place the sugar and water into a pan, and bring to a boil over medium-high heat. Lower the heat to medium and evaporate the syrup, gently agitating the pan occasionally, until it begins to color, around 10 minutes. Reduce the heat to low, and continue to cook the syrup until the desired level of caramelization is reached. Darker syrup will offer a more complex flavor; it will also have more bitter notes, which is not to everyone’s taste.

Caramel is fairly forgiving - if instead of a merrily bubbling syrup you find yourself staring at a pan full of sugar clumps, do not despair. Add enough hot water to dissolve all the crystals, lower the heat and start again.

Patience is essential when making caramel. The cooking process follows an exponential curve - nothing happens for the first 3 minutes, followed by 10 minutes of slow evaporation, and another 5 minutes of rapid caramelization.

Carefully pour the caramel over the hazelnuts, starting in the center and working out towards the edges. If the caramel sets too quickly, place the pan back on low heat to return to liquid form. Use a spoon to pour the caramel over any spots without sufficient coverage. Sprinkle with fleur de sel , sea salt or kosher salt.

To cut a bar of brittle into smaller portions, do so before the caramel hardens completely. For every cut, run very hot water over a chef's knife, wipe dry and press straight down with even force.

Wait at least 30 minutes to allow the caramel to set before removing the brittle from the tray. If you can force yourself to share, pack the brittle in cellophane or wrap in wax or parchment paper for a lovely home-made gift.

Caramelized bananas
This recipe, with or without alcohol, makes a decadent topping for waffles, pancakes, ice-cream or yogurt.
Serves 2.
  • 2 Tablespoons sugar
  • 1½ teaspoons unsalted butter
  • 1 ripe banana
  • pinch of fleur de sel, sea salt or kosher salt
  • 1-2 Tablespoons rum or brandy (optional)


Peel the banana and and slice on an angle into ¼ inch (1cm) thick slices.
Combine sugar and just enough water to form a paste (a Tablespoon or two should be enough) in a small frying pan. Bring to a boil, and cook until the caramel reaches a medium amber color.

Take the pan off the heat, and add the butter; be careful, the caramel will bubble and sputter. Return to low heat and swirl to combine. Carefully add the banana slices. Let cook for 30 seconds, and gently flip the bananas over. Optional - add the alcohol, let heat for 5 seconds and ignite (with a match or directly from the gas flame). If the caramel sauce is getting too thick and sticky, thin out with a Tablespoon or two of water.

Spoon over the yogurt (or ice-cream, pancakes, waffles, etc.) and sprinkle with salt.


World’s easiest dulce de leche (caramel sauce)
This makes an incredible sauce for vanilla ice-cream or crepes, and a delicious filling for layered cakes. Stirred into coffee, it transforms a cup of black into café au lait with a caramel shot.

Theoretically, dulce de leche keeps in the refrigerator indefinitely; no empirical verification has been possible so far, as the sauce mysteriously disappears within one week.

Makes 1 can.
  • 1 can sweetened condensed (whole) milk


Place the unopened can in a pot. It is advisable to pad the can with a folded towel to prevent irritating drumming once the water comes to a boil.

Fill the pot with enough cold water to cover the can by at least 1 inch (3 cm). Bring to a boil over medium heat; lower the heat to a gentle simmer, and leave on the stove for 3½ to 5 hours, checking the pot every 30-45 minutes and maintaining the water level by adding boiling water as necessary. The longer the cooking time, the denser, darker and richer the sauce.

Let the can cool in the cooking water, or, having reached the end of your patience, open immediately and, spoon at the ready, gaze at the wonder you have made.


To make an easily spreadable or pourable sauce, reheat gently in a water bath - set the open can or a bowl with sauce in a pot with an inch or two of hot water over a low heat. Warm, stirring occasionally, until desired consistency is reached.

Lazy mille-feuille
Cut defrosted puff pastry into 4x1½ inch (10x4 cm) rectangles for individual pastries, or larger squares of any size for a dramatic single torte. At least three layers are advised.

Bake according to package directions. Cool, layer with caramel sauce and top with fresh berries.

April 20, 2015

Raisin rice pudding

Davros: ”We shall become all p...”
The Doctor (interrupting): ”Powerful! Crush the lesser races! Conquer the galaxy! Unimaginable power! Unlimited rice pudding!”
Doctor Who: Remembrance of the Daleks (Part IV)

A recent houseguest, upon hearing we were having rice pudding for dessert, informed me that his father, and his father's father before him, were proprietors of an extremely successful Greek diner in New York City; as such he believed himself to be somewhat of a expert on the dish. Upon tasting this pudding, he sat for several minutes in meditative silence, looked me in the eye and said, ”I don't understand - this has so much flavor! How is it possible for rice pudding to have so much flavor?”

Rice pudding, while firmly established as an indulgent treat in the desserts category, is surprisingly healthy. A generous serving has less than one glass of whole milk and a just a few teaspoons of rice and sugar. The pudding's luscious, creamy texture results not from butter or cream but rather from amylopectin, one of the two components of starch (the other is amylose). As the rice cooks, it absorbs the milk, each grain increasing in size several times. At the same time, the grains release starch that acts as a thickening agent. To achieve the correct texture, it is important to select the right rice.

This recipe calls for short-grain rice, which has a very high amylopectin content. Short-grain is a classification, not a specific variety; Arborio (or any generic risotto) rice or sushi rice would work well. There is no need to look for a specific brand - the required rice grain, under any name, should be a stubby oval instead of a long, thin grain. Medium-grain rice (indeed, some classify risotto rices as medium rather than short-grain) could be used as well - its lower amylopectin content will simply produce a softer and more relaxed pudding.

Look for rice with grains similar to those on the left (on the right is Basmati rice, a long-grain variety, for comparison). Rather than paying a premium for fancy risotto rice, look for the right rice in a Middle Eastern grocery - rice pudding is a popular dish throughout the region, and the prices tend to be more than reasonable.

Raisin rice pudding
Inspired by the baked rice pudding from Marion Cunningham's The Breakfast Book.


              2-3 Servings               4-6 Servings
  • 2½ Cups whole milk
  • 2 Tablespoons short-grain rice
  • 3 Tablespoons sugar
  • ¼ teaspoon salt
  • ½ vanilla bean
  • 3 cardamom pods
  • 1 cinnamon stick
  • ¼ teaspoon grated nutmeg
  • 3 Tablespoons raisins
  • 5 Cups whole milk
  • 4 Tablespoons (¼ Cup) short-grain rice
  • 6 Tablespoons sugar
  • ½ teaspoon salt
  • 1 vanilla bean
  • 5-6 cardamom pods
  • 1-2 cinnamon sticks
  • ½ teaspoon grated nutmeg
  • 6 Tablespoons raisins
Preheat the oven to 150°C / 300°F.
N.B. If using a convection oven, reduce the temperature to 135°C/275°F.

Cut the vanilla bean 1 in half lengthwise and scrape out the seeds with the back of the knife blade.

Place vanilla seeds and empty pod into an oven-safe, heavy-bottomed dish, add all the remaining ingredients except raisins and stir well.

N. B. This recipe works equally well with coconut milk, diluted with water in a 1:1 ratio.

Cover and bake, stirring after the initial 20, 40 and 60 minutes. After a total of 2½ to 3 hours for the smaller batch (3½ - 4 hours for the larger one), remove from the oven, stir in the raisins, cover again and let rest for at least 15 minutes. The moisture and heat from the pudding will plump and soften the raisins.
N.B. The total cooking time needed will vary depending on the baking vessel. A wide, shallow dish promotes evaporation, and the pudding will reach the right consistency faster than if cooked in a narrow, tall pot.

The result is dense and rich, heady with bold, exotic flavors of cardamom and cinnamon. For a gentler, more mellow flavor, omit all spices except the nutmeg. For a softer texture, thin the pudding with some warm milk before serving or use a medium-grain rice such as Calrose. Adjust the sugar level to your liking, increase the amount of raisins or leave them out entirely.

The pudding should keep in the refrigerator for up to five days; it never seems to last more than two.


1 A quick note on vanilla beans. Purchasing vanilla beans at the last minute in the local supermarket tends to be expensive and often offers only a solitary, dessicated bean. As a sporadic baker, I do not use a lot of vanilla beans, although I do buy them in bulk when a good price/quality ratio is on offer. Theoretically, high-quality vanilla will keep almost indefinitely in a cool, dark place; however, even when properly stored the beans do tend to dry out over time. Macerating the beans in alcohol keeps them plump and has the added benefit of producing an excellent vanilla extract, something even a casual baker will find useful.

Start with a clean, resealable, watertight container; add vanilla beans, and enough good quality vodka (nothing that comes in a one-gallon plastic jug, please) to completely submerge the beans. Minimum recommended ratio is 5-6 vanilla beans for every 1 Cup/250ml of alcohol (at least 70 proof). Seal the container and leave in a cool, dark place. Shake occasionally; after 4-6 weeks the extract will be ready for use. As the liquid level drops, top off with more vodka and add vanilla beans as they are purchased. When a recipe calls for a vanilla bean rather than extract, pull one out of the jar and cut off the end - the seeds will pour out, no scraping necessary.