| Bread is the only food I know that satisfies completely, all by itself. It comforts the body, charms the senses, gratifies the soul, and excites the mind. A little butter also helps. |
| ~ Jeffrey Steingarten, The Man Who Ate Everything |

In November 2006, The New York Times published a bread recipe from Mr. Jim Lahey, of Sullivan Street Bakery. A recipe that was so simple a child could follow it and produce bakery-quality bread. The article ignited a home-baking frenzy, generated countless blog posts, discussion boards and demo videos, and remains one of the most popular recipes The Times has ever published.
It did not work for me.
Not because it didn't make incredibly delicious bread (it did!), but because working with the dough was frustratingly difficult.
Traditionally, bread is made with just four ingredients - flour, water, salt, and yeast. Yeast is a living organism, and consumes the carbohydrates found in the flour, producing carbon dioxide gas. In addition to carbohydrates, flour also contains gluten, a protein which forms long, flexible strands when the dough is kneaded. When the dough is proofing (or rising) the CO2 bubbles are trapped in the elastic network formed by the gluten strands. This forces the dough to expand in volume and at the same time to lighten in texture, and allows the bread loaf to hold its shape.
Mr. Lahey's recipe eliminates the laborious and time-consuming process of kneading the dough. Instead, gluten is developed over a long rise, the protein strands aligning naturally due to the high water content of the dough. Unfortunately, the wetness of the dough made it difficult to fold and shape as specified, requiring a lot of additional flour, and made it challenging to get into the baking vessel safely1. The dough also spread out very easily, resulting in a flat, wide loaf, more like a ciabatta than a traditional domed boule.
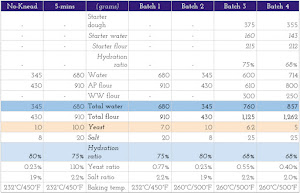
Hydration ratio - the ratio of water ( and other liquids) to flour, by weight - for No-Knead Bread is 80%. Another popular bread recipe, from The New Artisan Bread in Five Minutes a Day, also relies on moisture, with a 75% hydration ratio. This dough is more stable that No-Knead Bread, but remains difficult to shape, and requires a well-floured counter and hands.
Several weeks of experimentation2 with various hydration ratios, flours and baking temperatures have resulted in a recipe which produces a delicious, chewy loaf, with a rustic, open crumb and a crisp crust. There is still no kneading involved, and with the right tools, no additional flour is required after the dough is mixed.
Mr. Lahey's technique ingeniously allows home bakers to replicate the moist environment of mist-injecting commercial ovens. Baking in a sealed, preheated vessel traps steam around the loaf, ensuring a shatteringly crisp crust and a soft, chewy interior. I use a round, 3.5-quart Le Creuset Dutch oven; any ovenproof, lidded vessel will work, as long as it can withstand 260°C / 500°F.

There are several additional pieces of equipment which simplify the process.
- Silpat baking mat - this flexible baking mat is non-stick, and makes it possible to fold and shape the dough without any additional flour. It is also great for baking cookies, and absolutely indispensable for making tuiles and lacy Parmesan frico.
- Dough scraper - facilitates folding and flipping the dough, while keeping your hands clean. Can be used to divide dough (in this and other recipes), scrape down sides of the bowl when mixing batters, and to corral and transfer finely chopped ingredients.
- Digital scale - extremely helpful for accurately portioning the ingredients. There is no standard for measuring cups and spoons, and the difference an be as much 25% by weight. Flour weight vs. volume varies depending on how the flour is added to the measuring cup; kosher and table salts have different volumes for the same mass. A digital scale simplifies the measuring process. However, it is not indispensable for a successful loaf - the recipe contains notes for a preparation without a scale.

☙ ☙ ☙ 2016.12.26 update: After nine months of baking at least two loaves a week, and continued experimentation, the yeast has been reduced to 1 gram / ¼ teaspoon, and first rise extended to 24 hours. The longer rise also develops deeper flavor, so the dough is ready to bake immediately, skipping the refrigerated rise. Loaf size has been increased to 800 grams, reducing recipe yield to two loaves. And during the summer, I was gifted the best vessel for baking bread - a Brazilian soapstone pot. If you are planning to bake bread regularly, it is well-worth the investment. ☙ ☙ ☙
This is a lazy recipe, but not a quick one. Mix the dough in the morning, and leave to rise during the day. Refrigerate overnight, and it will be ready to bake by lunchtime the following day.
The dough can be refrigerated for up to two weeks. As the dough ages, it develops a light sourdough flavor, making the bread taste more complex and delicious. A small amount of leftover dough can be used as a erzats starter for the next batch (I have not washed my dough container since the first batch, five weeks ago).
Makes three 500-gram / 1.1-pound loaves, with some aged dough remaining to flavor the next batch.
|
• 1,000 grams • 680 grams • 5 grams • 20 grams |
/ 35.25 ounces (2.2 lbs) All-Purpose (AP) white flour / 24 ounces water / 0.18 ounces active dry yeast / 0.71 ounces salt |
If a digital scale is not available, measure as follows:
|
• 8⅓ cups AP white flour, using the spoon-and-level method • 3 Cups water • 1¼ teaspoons active dry yeast • 1¼ Tablespoons kosher salt (reduce to 1 Tablespoon for table salt) |
Any container can be used for proofing the dough. It should be large enough to to accommodate the rise - expect the dough to grow two to three times its original volume. I have recycled a 1-gallon (~4 liter), plastic, lidded kimchi container3, which is just big enough. For those with lower rates of kimchi consumption, similar containers can be purchased for less than the cost of fancy coffee beverage. It is convenient to track various dough iterations by making notes on the lid with a Sharpie; when starting a new batch, the old notes wipe off with a little rubbing alcohol.
In the absence of a lidded container, any large bowl will do; if available, cover the bowl with a new plastic shower cap instead of plastic wrap. The shower cap will not accidentally form an air-tight seal, and it is much easier to reuse.
Combine flour, yeast and salt in the container; stir to combine. Add the water, and mix using a spoon, fork or your hands. This is the most labor-intensive part of the process. The relatively low hydration ratio means the dough will initially feel dry and stiff. Mix just until just combined, and there are no obvious large pockets of flour left.
For subsequent batches, if using leftover aged dough, reverse the order of dry and wet ingredients. First, add water to the starter dough and mix well (a stick blender works wonders). Add the flour, yeast and salt, and proceed as directed.

Cover the container with a lid; do not form an air-tight seal.
Leave to ferment at room temperature for 6-12 hours, until doubled in volume (the blue mark below shows the level of just-mixed dough). Total rise time will depend on the ambient room temperature, the freshness and overall feistiness of the yeast. The risen dough should have a pleasant, yeasty fragrance, and the sides and surface should be dotted with lots of small bubbles.
After the initial rise, refrigerate the dough for at least 8 hours. Refrigerated, the dough will keep for up to two weeks, rising very slowly and developing a more complex flavor as it ages.

Carefully scoop out (with wet hands or a dough scraper) a piece of dough the size of a very large grapefruit. If using a digital scale for precise portioning, measure out 500 grams/18 ounces (1.1lbs). Try to remove the dough in a single piece, without damaging the gluten strands or compacting the dough too much.
Return the remaining dough, still loosely covered, to the refrigerator.
Cover the portioned dough with an inverted mixing bowl or a piece of plastic wrap, and let rest at room temperature for 15-20 minutes.
After the dough has warmed up, perform the first folding. Using wet hands or the dough scraper (dry, well-floured hands if working on a floured surface), fold the dough in on itself, going around the perimeter to make a rough ball. Flip the dough seam side down, cover again and let rise for 2 hours. For best crumb texture, repeat the fold and flip every 30 minutes. These additional folds are not critical, and can be skipped during the rise.

After 2 hours, fold and flip the dough. Cover, and let rest while the oven is preheating.
Safety note: Make sure all parts of the baking vessel are rated to the specified baking temperature. If using a classic Le Creuset pot, it is important to replace4 or remove the lid knob, as it is only rated to 190°C / 375°F. It is not advisable to reduce the baking temperature5, as this will affect the crust formation and oven spring - the dramatic expansion of a loaf as the yeast reacts to its new, hot environment with a final, frantic burst of fermentation.
Place the baking vessel in a cold oven, keeping the bottom and lid separate. It is easiest to put both pieces side by side on a baking sheet. Preheat the oven to 260°C / 500°F; once the temperature is reached, allow the baking vessel to continue heating for another 5-10 minutes.
When the oven is fully heated, fold and flip over the dough - the seams from the folds should be on the bottom.
With wet hands (dry and floured if not using a Silpat mat), gently cup the dough with the edges of your palms, and, without lifting, rotate in one direction. The surface tension on the bottom will pull the dough in on itself; continue to rotate until the dough forms a sphere. Be careful not to press the dough too hard and deflate the CO2 bubbles. The dough should be rotated at least 7 full turns, and form a fairly tight ball.

If using, sprinkle the top liberally with ¼ Cup wheat bran, cornmeal or instant oatmeal.
Place your hand under the Silpat mat (or scoop up the dough) and working quickly, open the oven, flip the dough into the baking vessel, with the seams from the fold now on top. Put on the lid - don't forget the oven mitt! - close the oven, and set the timer for 20 minutes.
After 20 minutes, remove the lid, and reduce the oven temperature to 232°C / 450°F. Continue baking for another 15-20 minutes, until the top is nicely browned and internal temperature reaches 88°C / 190°F. If you don't have an instant-read thermometer, take out the loaf, and carefully tap the bottom - it should sound hollow. Exact baking time is difficult to specify, as it will depend on the material of the baking vessel, size of the loaf and temperament of the oven.

Cool the bread on a wire rack, and resist the temptation to tear into a hot loaf - it will crush the bread out of shape, and interfere with the final stage of flavor and texture development.

Baker's notes
Below are some observations on the ingredients and techniques collected over several weeks of experimentation.
Yeast
Although baking is considered a precise science - more chemistry that cooking - bread dough is surprisingly flexible. The yeast-to-flour ratio can vary by a factor of four without detrimental effect. What will change is how fast the dough proofs, and the complexity of flavor that develops. Lower yeast percentage means a slower rise and a more interesting flavor; more yeast creates a faster rise and a blander bread. Use at least 2 grams of yeast per 1,000 grams of flour; increase the proofing time proportionally.
The original No-Knead Bread recipe called for instant yeast. It doesn't really matter which type of dry yeast is used - the long proofing time ensures a good rise. The standard conversion is 1 gram instant to 1.35 grams active dry yeast. If using cake (fresh) yeast, increase the weight to 2.7 grams of cake for every gram of instant yeast.
Water
The hydration ratio can be tweaked to achieve desired texture. The lower the ratio, and drier the dough, the more dense and tight the crumb (e.g. bagels); higher water content results in a more open crumb (e. g. baguettes, ciabatta). While wetter dough gives a more rough and airy interior, it also makes it more difficult to shape the dough, and the final loaf will not rise as high, or have a well-defined dome.
Flour
Flour choice will also affect the look and texture of the bread. Regular, white all-purpose (AP) flour will produce a shiny, hard crust and open crumb. Replacing some of the AP flour with whole wheat flour will give the bread a pleasantly bitter, nutty flavor, but the oils in the wheat germ will also interfere with crust formation, making it softer. Whole wheat flour also produces a denser loaf with a tighter crumb texture. Replace 30% of the white flour with whole wheat to start, and increase or decrease depending on how much you like the result.
Important note: Adding whole wheat flour to the dough also makes it more perishable - use the dough within 1 week.
Stone-ground flour will give a more rustic appearance to the loaf. It is also more hydroscopic - if the dough is too dry and difficult to mix, add a Tablespoon or two of water.6
On the left: 70% AP - 30% whole wheat flour; 68% hydration ratio. On the right: 100% AP flour, 80% hydration ratio.

Toppings and mix-ins
If desired, sprinkle the top with sesame seeds, sunflower seeds or poppy seeds after dropping the bread dough into the preheated baking vessel.
To bake flavored bread - raisin-nut, olive, sunflower seed - do not fold after the initial resting period. Instead, sprinkle the dough with ½ Cup of the desired filling. Roll up the dough, fold the ends of the roll to the center, and flip. After resting for 30 minutes, perform a fold as instructed in the recipe (do not worry if the filling tears the dough a little). Folding at least twice more will ensure an even distribution.
Sandwich loaf
To make a sandwich loaf, pull off a 900 gram/ 32 ounce (2lbs) - the size of a melon - piece of dough. Follow the steps through the initial resting and folding as instructed in the recipe.
Grease a loaf pan with a neutral oil (grape seed, canola, rice bran) or coat with non-stick baking spray. Optionally, coat bottom and sides with cornmeal, wheat bran or instant oatmeal - add to the greased pan and shake around to cover the bottom and sides.
Shape the dough into an oblong, and drop carefully into the prepare loaf pan. Cover and let rise for 2 hours.
Before putting into the oven, slash the top with a knife or cut with scissors several times to prevent the crust from exploding.
A standard loaf pan should fit inside a 5-quart Dutch oven. If it is not possible to bake with the loaf pan inside a pre-heated Dutch oven, place two racks in the oven. On the bottom rack, place a roasting pan or another oven-proof vessel with two cups of boiling water - put the roasting pan in the oven first and then carefully add the water. Preheat the oven to 260°C / 500°F.
Once the oven is preheated, place the loaf pan with the dough on the top rack, and bake for 20 minutes. After 20 minutes, remove the roasting pan with water, and lower the heat to 232°C / 450°F. Bake for another 20-30 minutes, testing for doneness as specified in the recipe.

1 The problem may be in how the flour was measured. The original recipe calls for 3 cups of flour, but does not specify how to measure it. With the generally accepted spoon-and-level method, a cup of flour will weigh 120 grams/4.2 ounces, much less than the 430 grams/15.2 ounces specified in the amended recipe.