

The husband replies: "I haven't eaten anything in 10 days! I am starving, and haven't been able to sleep or concentrate on anything."
Wife: "How is that possible? I left a refrigerator full of groceries, enough food for a month, and really detailed recipe cards."
Husband: "I know! I was fine following the recipe cards for 3 days, but after that I was stuck. All the recipes start with take a clean pan."
~ Folk humor, translated by the hedgehog
The first step in making a caramelized onion tart, or, for that matter, any recipe that requires caramelized onions, is to prepare the onions. The process is very simple, and does not require a lot of attention, although it will take a few hours. This is a perfect activity if you are planning to spend a few hours watching Netflix, reading or
- add sweetness and crunch to sandwiches
- top pizzas, including that great French classic - pissaladière
- be tossed with green beans or pasta
- get baked into caramelized onion and gruyere biscuits
- achieve the glory that is French onion soup
- get eaten with a fork directly from the jar

So, take a clean pot...

Caramelized onions
It's best to use a heavy-duty pot. A Dutch oven works perfectly, but any serious vessel will do. Avoid pots with thin walls, as the onions will burn. It's best to use something with a lid; absent a lid use tin foil to cover.
The onions will cook down to a fraction of the starting volume, so the bigger the batch, the better.
- 6 -10 (or more) yellow onions, any size. I suggest to use many as will fit in the cooking vessel
- 1 to 2 Tablespoons of a neutral oil (I used rice bran oil, but anything with a higher smoking point will do)
- 1 to 2 Tablespoons of butter (for flavor, and may be omitted)
- 1 - 2 teaspoons salt
Preheat the oven to 200°C / 400°F.
Peel the onions, and slice in half pole-to-pole, then slice each half into wedges.


After 30 minutes, stir the onions, and lower the oven temperature to 160°C / 325°F. Give the onions a good stir every 30 to 45 minutes.
After 2 hours, the onions will start to caramelize; total cooking time will depend on the onion quantity and oven temperament. This particular batch took a little over 4 hours.
Keep an eye on it, and stop cooking once the onions are the color of burnished mahogany and the scent of caramelized onions has permeated the house.


Both store-bought and home-made puff pastry or any short pastry dough works in the recipe.
My local grocery store carries puff pastry pre-cut into 5-inch squares and rolled out, saving a step. A sheet of store-bought frozen puff pastry will make 4 individual tarts or a single large one. If buying frozen puff pastry, check that it's made with butter. Dufour offers an all-butter crust.
Makes make 4-6 small or a single large tart. Halving the recipe will make 2 individual tarts.
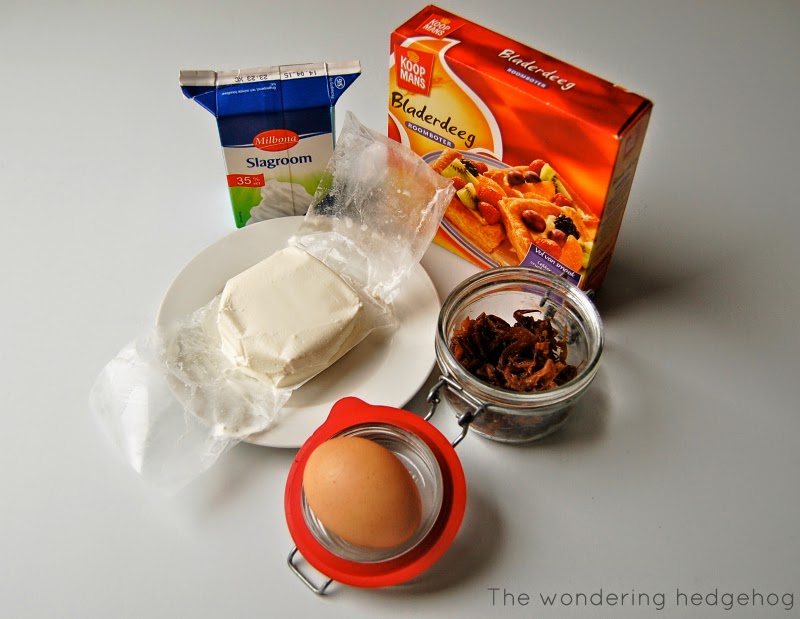
- 1 sheet puff pastry (defrosted in refrigerator overnight)
- 2 eggs
- ½ Cup cream
- ¼ Cup or 4 Tablespoons caramelized onions
- ¼ Cup or 4 Tablespoons fresh goat cheese
- ¼ teaspoon freshly ground nutmeg
- Freshly ground pepper
- Pinch of salt
Preheat the oven to 190°C / 375°F.
If necessary, roll out the puff pastry to cover the tart mold. Since I was using individual 5x5 squares, I baked the tarts in a ceramic ramekin. Any oven-proof vessel will work, although a metal form is better for browning the crust. Make sure the dough goes up the sides by at least ½ inch in order to contain the filling.
Fit the dough into the form(s). Cover with aluminum foil and top with rice, beans or pennies. Pennies are better for heat transfer, but not everybody has a jar of pennies on their desk.
Bake the shells for 15 minutes; remove from the oven, take out the foil.

While the shells are blind-baking, mix the filling. Add the filling to the shells, and put back in the oven. Bake until the filling is set and the crust is a nice golden brown. Timing will depend on the oven, but start checking after 10 minutes for small tarts and 15 minutes for larger ones.
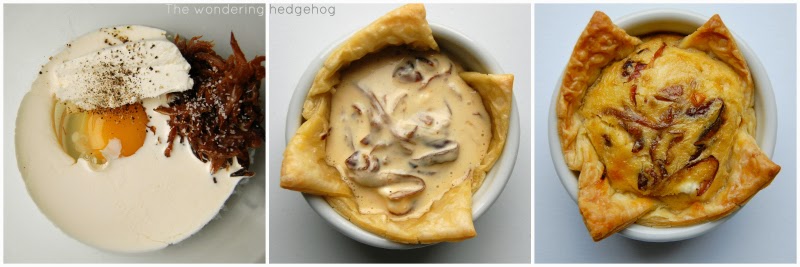
Cool the tart for 10 minutes, and serve with a simple green salad.
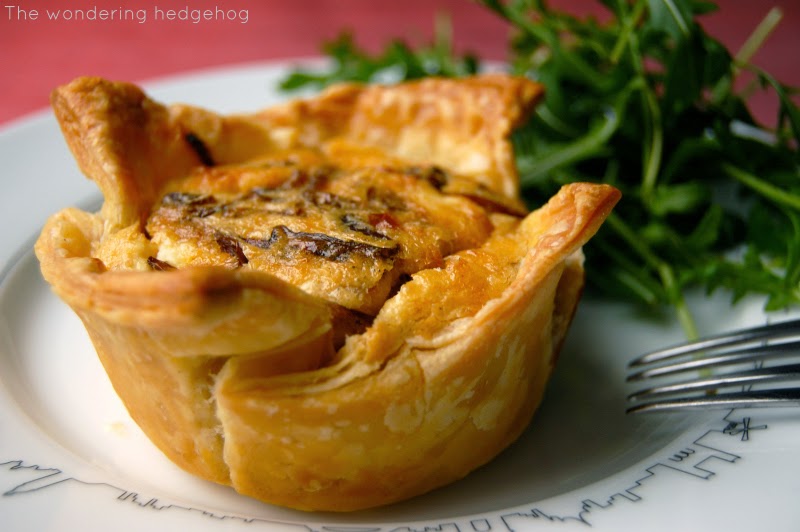
If you have left-over filling, you can bake it in a ramekin lined with a paper muffin liner for a single-serving crustless quiche. The entire recipe can be made this way for those wishing to avoid gluten or not wishing to fuss with pastry. Serve with a simple green salad.
1Russian jokes translate well approximately 30% of the time. The rest of the time they leave the English-speaking audience bewildered and confused. If you were not amused by the joke, please click through to see some otters.
2Useful tip: This method works really well for other ingredients where a only portion of a package is needed: tomato paste, harissa, chipotle chiles in ancho sauce, etc.
No comments:
Post a Comment